動畫教學
本教學課程示範如何在 Flutter 中建構顯式動畫。在介紹動畫程式庫中的一些基本概念、類別和方法之後,它會引導您完成 5 個動畫範例。這些範例相互建立,向您介紹動畫程式庫的不同面向。
Flutter SDK 也提供內建的顯式動畫,例如 FadeTransition、SizeTransition 和 SlideTransition。這些簡單的動畫是透過設定開始點和結束點來觸發。它們比此處描述的自訂顯式動畫更容易實作。
基本的動畫概念和類別
#Flutter 中的動畫系統是以類型化的 Animation 物件為基礎。Widget 可以直接在它們的建構函式中透過讀取它們的目前值並監聽它們的狀態變更來合併這些動畫,或者它們可以使用動畫作為更精細動畫的基礎,並將其傳遞給其他 widget。
Animation<double>
#在 Flutter 中,Animation 物件不知道螢幕上的任何內容。Animation 是一個抽象類別,它會了解其目前值及其狀態(已完成或已關閉)。比較常用的動畫類型之一是 Animation<double>。
Animation 物件會在特定持續時間內,依序產生兩個值之間的內插數字。Animation 物件的輸出可能是線性的、曲線、步階函式或您可以設計的任何其他對應。根據 Animation 物件的控制方式,它可以反向執行,甚至可以在中間切換方向。
動畫也可以內插 double 以外的類型,例如 Animation<Color> 或 Animation<Size>。
Animation 物件具有狀態。其目前值始終可在 .value 成員中使用。
Animation 物件不知道呈現或 build() 函式。
CurvedAnimation
#CurvedAnimation 將動畫的進度定義為非線性曲線。
animation = CurvedAnimation(parent: controller, curve: Curves.easeIn);CurvedAnimation 和 AnimationController(在下一節中說明)都是 Animation<double> 類型,因此您可以互換傳遞它們。CurvedAnimation 會包裝它正在修改的物件,您不會對 AnimationController 進行子類別化以實作曲線。
AnimationController
#AnimationController 是一個特殊的 Animation 物件,它會在硬體準備好處理新的影格時產生新值。依預設,AnimationController 會在給定持續時間內線性產生從 0.0 到 1.0 的數字。例如,此程式碼會建立 Animation 物件,但不會開始執行
controller =
    AnimationController(duration: const Duration(seconds: 2), vsync: this);
AnimationController 衍生自 Animation<double>,因此可以在需要 Animation 物件的任何地方使用。但是,AnimationController 具有其他方法來控制動畫。例如,您可以使用 .forward() 方法開始動畫。數字的產生與螢幕重新整理相關聯,因此通常每秒產生 60 個數字。在產生每個數字之後,每個 Animation 物件都會呼叫附加的 Listener 物件。若要為每個子系建立自訂顯示清單,請參閱 RepaintBoundary。
建立 AnimationController 時,您會傳遞 vsync 引數。vsync 的存在可防止螢幕外動畫耗用不必要的資源。您可以透過將 SingleTickerProviderStateMixin 新增至類別定義,來使用您的具狀態物件作為 vsync。您可以在 GitHub 上的 animate1 中看到此範例。
Tween
#依預設,AnimationController 物件的範圍從 0.0 到 1.0。如果您需要不同的範圍或不同的資料類型,您可以使用 Tween 來設定動畫,以內插到不同的範圍或資料類型。例如,下列 Tween 會從 -200.0 到 0.0
tween = Tween<double>(begin: -200, end: 0);Tween 是一個無狀態物件,它只會採用 begin 和 end。Tween 的唯一工作是定義從輸入範圍到輸出範圍的對應。輸入範圍通常是 0.0 到 1.0,但這不是必要條件。
Tween 繼承自 Animatable<T>,而不是繼承自 Animation<T>。Animatable 與 Animation 一樣,不必輸出 double。例如,ColorTween 會指定兩種顏色之間的進度。
colorTween = ColorTween(begin: Colors.transparent, end: Colors.black54);Tween 物件不會儲存任何狀態。相反地,它會提供 evaluate(Animation<double> animation) 方法,該方法會使用 transform 函式將動畫的目前值(介於 0.0 和 1.0 之間)對應到實際的動畫值。
Animation 物件的目前值可以在 .value 方法中找到。evaluate 函式也會執行一些內部管理作業,例如確保在動畫值分別為 0.0 和 1.0 時,會傳回 begin 和 end。
Tween.animate
#若要使用 Tween 物件,請在 Tween 上呼叫 animate(),並傳遞控制器物件。例如,下列程式碼會在 500 毫秒的過程中產生從 0 到 255 的整數值。
AnimationController controller = AnimationController(
    duration: const Duration(milliseconds: 500), vsync: this);
Animation<int> alpha = IntTween(begin: 0, end: 255).animate(controller);下列範例顯示了控制器、曲線和 Tween
AnimationController controller = AnimationController(
    duration: const Duration(milliseconds: 500), vsync: this);
final Animation<double> curve =
    CurvedAnimation(parent: controller, curve: Curves.easeOut);
Animation<int> alpha = IntTween(begin: 0, end: 255).animate(curve);
動畫通知
#Animation 物件可以具有 Listener 和 StatusListener,它們是使用 addListener() 和 addStatusListener() 定義的。每當動畫的值變更時,就會呼叫 Listener。Listener 最常見的行為是呼叫 setState() 以導致重新建構。當動畫開始、結束、向前移動或向後移動(如 AnimationStatus 所定義)時,會呼叫 StatusListener。下一節將提供 addListener() 方法的範例,而 監控動畫的進度將示範 addStatusListener() 的範例。
動畫範例
#本節將引導您完成 5 個動畫範例。每個章節都會提供該範例的原始程式碼連結。
渲染動畫
#到目前為止,您已學習如何在一段時間內產生一系列數字。螢幕上尚未呈現任何內容。要使用 Animation 物件呈現,請將 Animation 物件儲存為您 Widget 的成員,然後使用其值來決定如何繪製。
請考慮以下繪製沒有動畫的 Flutter 標誌的應用程式
import 'package:flutter/material.dart';

void main() => runApp(const LogoApp());

class LogoApp extends StatefulWidget {
  const LogoApp({super.key});

  @override
  State<LogoApp> createState() => _LogoAppState();
}

class _LogoAppState extends State<LogoApp> {
  @override
  Widget build(BuildContext context) {
    return Center(
      child: Container(
        margin: const EdgeInsets.symmetric(vertical: 10),
        height: 300,
        width: 300,
        child: const FlutterLogo(),
      ),
    );
  }
}
應用程式原始碼: animate0
以下顯示修改後的相同程式碼,以使標誌動畫化,從無到完整大小。當定義 AnimationController 時,您必須傳入一個 vsync 物件。vsync 參數在AnimationController 區段中說明。
非動畫範例的變更已標示醒目顯示
class _LogoAppState extends State<LogoApp> {
class _LogoAppState extends State<LogoApp> with SingleTickerProviderStateMixin {
  late Animation<double> animation;
  late AnimationController controller;

  @override
  void initState() {
    super.initState();
    controller =
        AnimationController(duration: const Duration(seconds: 2), vsync: this);
    animation = Tween<double>(begin: 0, end: 300).animate(controller)
      ..addListener(() {
        setState(() {
          // The state that has changed here is the animation object's value.
        });
      });
    controller.forward();
  }

  @override
  Widget build(BuildContext context) {
    return Center(
      child: Container(
        margin: const EdgeInsets.symmetric(vertical: 10),
        height: 300,
        width: 300,
        height: animation.value,
        width: animation.value,
        child: const FlutterLogo(),
      ),
    );
  }

  @override
  void dispose() {
    controller.dispose();
    super.dispose();
  }
}
應用程式原始碼: animate1
addListener() 函數會呼叫 setState(),因此每次 Animation 產生一個新數字時,都會將目前影格標記為髒污,這會強制再次呼叫 build()。在 build() 中,容器的大小會變更,因為其高度和寬度現在使用 animation.value 而不是硬式編碼的值。當捨棄 State 物件時,請處置控制器以防止記憶體洩漏。
經過這些少許變更,您已在 Flutter 中建立您的第一個動畫!
使用 AnimatedWidget 簡化
#AnimatedWidget 基底類別可讓您將核心 Widget 程式碼與動畫程式碼分隔開。AnimatedWidget 不需要維護 State 物件來保存動畫。新增以下 AnimatedLogo 類別
class AnimatedLogo extends AnimatedWidget {
  const AnimatedLogo({super.key, required Animation<double> animation})
      : super(listenable: animation);

  @override
  Widget build(BuildContext context) {
    final animation = listenable as Animation<double>;
    return Center(
      child: Container(
        margin: const EdgeInsets.symmetric(vertical: 10),
        height: animation.value,
        width: animation.value,
        child: const FlutterLogo(),
      ),
    );
  }
}
AnimatedLogo 在繪製自身時,會使用 animation 的目前值。
LogoApp 仍管理 AnimationController 和 Tween,並將 Animation 物件傳遞給 AnimatedLogo
void main() => runApp(const LogoApp());

class AnimatedLogo extends AnimatedWidget {
  const AnimatedLogo({super.key, required Animation<double> animation})
      : super(listenable: animation);

  @override
  Widget build(BuildContext context) {
    final animation = listenable as Animation<double>;
    return Center(
      child: Container(
        margin: const EdgeInsets.symmetric(vertical: 10),
        height: animation.value,
        width: animation.value,
        child: const FlutterLogo(),
      ),
    );
  }
}

class LogoApp extends StatefulWidget {
  // ...

  @override
  void initState() {
    super.initState();
    controller =
        AnimationController(duration: const Duration(seconds: 2), vsync: this);
    animation = Tween<double>(begin: 0, end: 300).animate(controller)
      ..addListener(() {
        setState(() {
          // The state that has changed here is the animation object's value.
        });
      });
    animation = Tween<double>(begin: 0, end: 300).animate(controller);
    controller.forward();
  }

  @override
  Widget build(BuildContext context) {
    return Center(
      child: Container(
        margin: const EdgeInsets.symmetric(vertical: 10),
        height: animation.value,
        width: animation.value,
        child: const FlutterLogo(),
      ),
    );
  }
  Widget build(BuildContext context) => AnimatedLogo(animation: animation);

  // ...
}
應用程式原始碼: animate2
監控動畫的進度
#通常,知道動畫何時變更狀態會很有幫助,例如完成、向前移動或反轉。您可以使用 addStatusListener() 取得此通知。以下程式碼會修改先前的範例,使其監聽狀態變更並列印更新。醒目顯示的行會顯示變更
class _LogoAppState extends State<LogoApp> with SingleTickerProviderStateMixin {
  late Animation<double> animation;
  late AnimationController controller;

  @override
  void initState() {
    super.initState();
    controller =
        AnimationController(duration: const Duration(seconds: 2), vsync: this);
    animation = Tween<double>(begin: 0, end: 300).animate(controller)
      ..addStatusListener((status) => print('$status'));
    controller.forward();
  }
  // ...
}
執行此程式碼會產生此輸出
AnimationStatus.forward
AnimationStatus.completed
接下來,使用 addStatusListener() 在開始或結束時反轉動畫。這會產生「呼吸」效果
void initState() {
  super.initState();
  controller =
      AnimationController(duration: const Duration(seconds: 2), vsync: this);
  animation = Tween<double>(begin: 0, end: 300).animate(controller);
  animation = Tween<double>(begin: 0, end: 300).animate(controller)
    ..addStatusListener((status) {
      if (status == AnimationStatus.completed) {
        controller.reverse();
      } else if (status == AnimationStatus.dismissed) {
        controller.forward();
      }
    })
    ..addStatusListener((status) => print('$status'));
  controller.forward();
}
應用程式原始碼: animate3
使用 AnimatedBuilder 重構
#animate3範例中的程式碼有一個問題,就是變更動畫需要變更呈現標誌的 Widget。更好的解決方案是將職責分隔到不同的類別中
- 呈現標誌
- 定義
Animation物件 - 呈現轉換
您可以使用 AnimatedBuilder 類別來達成此分隔。AnimatedBuilder 是呈現樹狀結構中的獨立類別。與 AnimatedWidget 類似,AnimatedBuilder 會自動監聽來自 Animation 物件的通知,並在必要時將 Widget 樹狀結構標記為髒污,因此您不需要呼叫 addListener()。
animate4範例的 Widget 樹狀結構如下所示
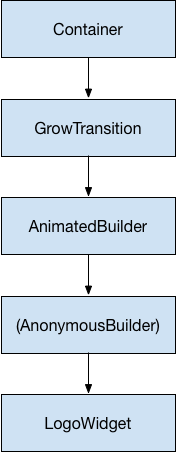
從 Widget 樹狀結構的底部開始,呈現標誌的程式碼很簡單
class LogoWidget extends StatelessWidget {
  const LogoWidget({super.key});

  // Leave out the height and width so it fills the animating parent.
  @override
  Widget build(BuildContext context) {
    return Container(
      margin: const EdgeInsets.symmetric(vertical: 10),
      child: const FlutterLogo(),
    );
  }
}
圖表中的中間三個區塊都是在 GrowTransition 中的 build() 方法中建立的,如下所示。GrowTransition Widget 本身是無狀態的,並保存定義轉換動畫所需的最終變數集。build() 函數會建立並傳回 AnimatedBuilder,該函數會採用(Anonymous 建構器)方法和 LogoWidget 物件作為參數。呈現轉換的工作實際上是在(Anonymous 建構器)方法中進行,該方法會建立適當大小的 Container 以強制 LogoWidget 縮小以符合。
以下程式碼中一個棘手的地方是子系看起來指定了兩次。發生的是,子系的外部參考會傳遞給 AnimatedBuilder,然後 AnimatedBuilder 將其傳遞給匿名閉包,然後該匿名閉包會使用該物件作為其子系。最終結果是 AnimatedBuilder 會插入呈現樹狀結構中兩個 Widget 之間。
class GrowTransition extends StatelessWidget {
  const GrowTransition({
    required this.child,
    required this.animation,
    super.key,
  });

  final Widget child;
  final Animation<double> animation;

  @override
  Widget build(BuildContext context) {
    return Center(
      child: AnimatedBuilder(
        animation: animation,
        builder: (context, child) {
          return SizedBox(
            height: animation.value,
            width: animation.value,
            child: child,
          );
        },
        child: child,
      ),
    );
  }
}最後,初始化動畫的程式碼看起來與animate2範例非常相似。initState() 方法會建立 AnimationController 和 Tween,然後使用 animate() 將其繫結。神奇之處發生在 build() 方法中,該方法會傳回帶有 LogoWidget 作為子系,以及一個動畫物件來驅動轉換的 GrowTransition 物件。這些是上面項目符號清單中列出的三個元素。
void main() => runApp(const LogoApp());

class LogoWidget extends StatelessWidget {
  const LogoWidget({super.key});

  // Leave out the height and width so it fills the animating parent.
  @override
  Widget build(BuildContext context) {
    return Container(
      margin: const EdgeInsets.symmetric(vertical: 10),
      child: const FlutterLogo(),
    );
  }
}

class GrowTransition extends StatelessWidget {
  const GrowTransition({
    required this.child,
    required this.animation,
    super.key,
  });

  final Widget child;
  final Animation<double> animation;

  @override
  Widget build(BuildContext context) {
    final animation = listenable as Animation<double>;
    return Center(
      child: Container(
        margin: const EdgeInsets.symmetric(vertical: 10),
        height: animation.value,
        width: animation.value,
        child: const FlutterLogo(),
      child: AnimatedBuilder(
        animation: animation,
        builder: (context, child) {
          return SizedBox(
            height: animation.value,
            width: animation.value,
            child: child,
          );
        },
        child: child,
      ),
    );
  }
}

class LogoApp extends StatefulWidget {
  // ...

  @override
  Widget build(BuildContext context) => AnimatedLogo(animation: animation);
  Widget build(BuildContext context) {
    return GrowTransition(
      animation: animation,
      child: const LogoWidget(),
    );
  }

  // ...
}
應用程式原始碼: animate4
同時動畫
#在本節中,您將以監控動畫進度(animate3)中的範例為基礎,該範例使用 AnimatedWidget 來持續加入和退出動畫。請考慮您想要在不透明度從透明動畫化為不透明時加入和退出動畫的情況。
每個補間都會管理動畫的一個方面。例如
controller =
    AnimationController(duration: const Duration(seconds: 2), vsync: this);
sizeAnimation = Tween<double>(begin: 0, end: 300).animate(controller);
opacityAnimation = Tween<double>(begin: 0.1, end: 1).animate(controller);
您可以使用 sizeAnimation.value 取得大小,並使用 opacityAnimation.value 取得不透明度,但 AnimatedWidget 的建構函式只採用單一 Animation 物件。為了解決這個問題,範例會建立自己的 Tween 物件,並明確計算值。
將 AnimatedLogo 變更為封裝自己的 Tween 物件,而且其 build() 方法會在父系的動畫物件上呼叫 Tween.evaluate(),以計算所需的大小和不透明度值。以下程式碼會顯示帶有醒目顯示的變更
class AnimatedLogo extends AnimatedWidget {
  const AnimatedLogo({super.key, required Animation<double> animation})
      : super(listenable: animation);

  // Make the Tweens static because they don't change.
  static final _opacityTween = Tween<double>(begin: 0.1, end: 1);
  static final _sizeTween = Tween<double>(begin: 0, end: 300);

  @override
  Widget build(BuildContext context) {
    final animation = listenable as Animation<double>;
    return Center(
      child: Opacity(
        opacity: _opacityTween.evaluate(animation),
        child: Container(
          margin: const EdgeInsets.symmetric(vertical: 10),
          height: _sizeTween.evaluate(animation),
          width: _sizeTween.evaluate(animation),
          child: const FlutterLogo(),
        ),
      ),
    );
  }
}

class LogoApp extends StatefulWidget {
  const LogoApp({super.key});

  @override
  State<LogoApp> createState() => _LogoAppState();
}

class _LogoAppState extends State<LogoApp> with SingleTickerProviderStateMixin {
  late Animation<double> animation;
  late AnimationController controller;

  @override
  void initState() {
    super.initState();
    controller =
        AnimationController(duration: const Duration(seconds: 2), vsync: this);
    animation = CurvedAnimation(parent: controller, curve: Curves.easeIn)
      ..addStatusListener((status) {
        if (status == AnimationStatus.completed) {
          controller.reverse();
        } else if (status == AnimationStatus.dismissed) {
          controller.forward();
        }
      });
    controller.forward();
  }

  @override
  Widget build(BuildContext context) => AnimatedLogo(animation: animation);

  @override
  void dispose() {
    controller.dispose();
    super.dispose();
  }
}
應用程式原始碼: animate5
下一步
#本教學課程為您提供了使用 Tweens 在 Flutter 中建立動畫的基礎,但還有許多其他類別可以探索。您可能會研究專門的 Tween 類別、Material Design 特有的動畫、ReverseAnimation、共享元素轉換(也稱為英雄動畫)、物理模擬和 fling() 方法。請參閱動畫登陸頁面,以取得最新的可用文件和範例。
除非另有說明,否則本網站上的文件會反映 Flutter 的最新穩定版本。頁面上次更新於 2024 年 8 月 16 日。 檢視來源 或 回報問題。