UI 層案例研究
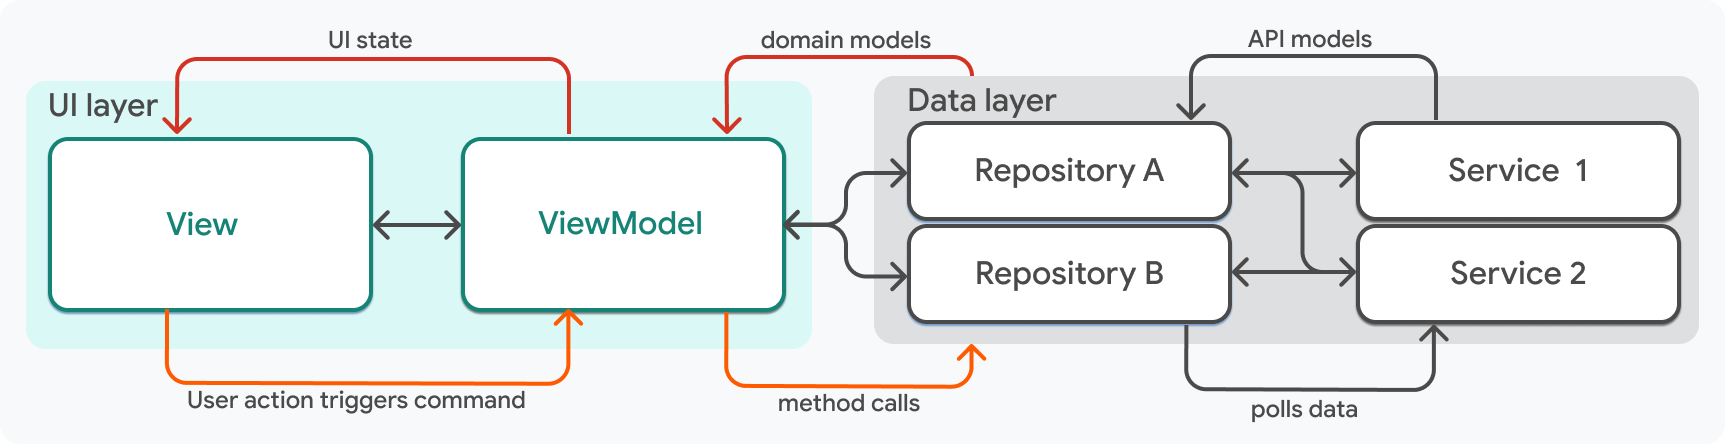
您 Flutter 應用程式中每個功能的 UI 層 應由兩個元件組成:一個 View 和一個 ViewModel。
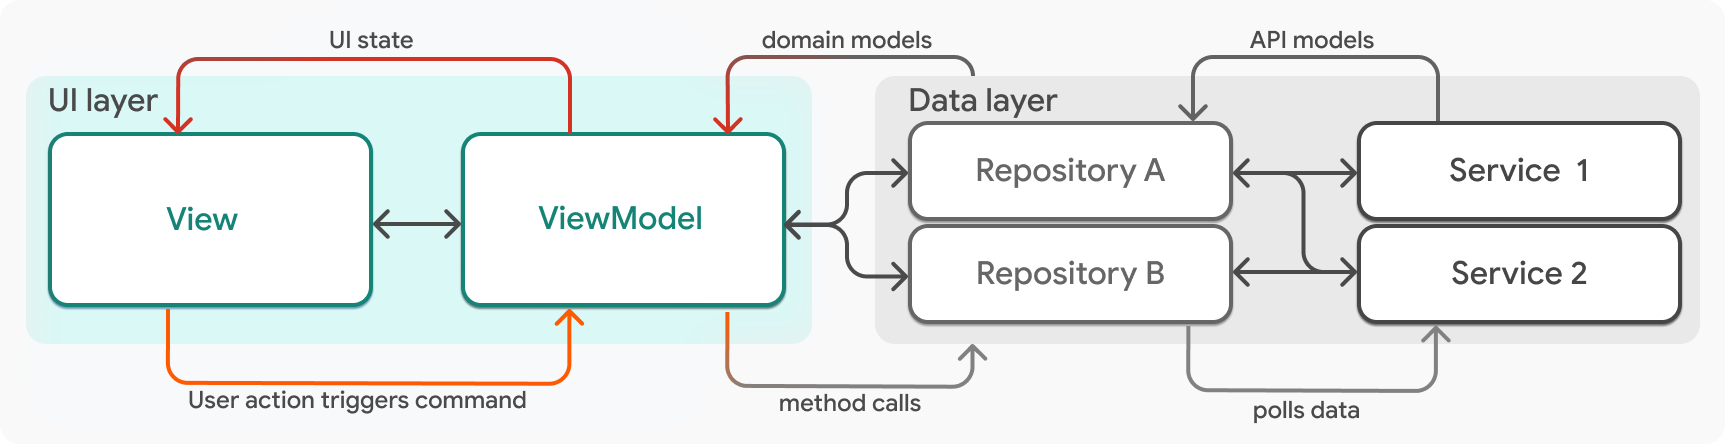
最廣義來說,視圖模型管理 UI 狀態,而視圖顯示 UI 狀態。視圖和視圖模型具有一對一的關係;對於每個視圖,都有一個對應的視圖模型管理該視圖的狀態。每一對視圖和視圖模型組成單一功能的 UI。例如,一個應用程式可能有稱為 LogOutView 和 LogOutViewModel 的類別。
定義一個視圖模型
#視圖模型是一個 Dart 類別,負責處理 UI 邏輯。視圖模型將網域資料模型作為輸入,並將該資料作為 UI 狀態公開給它們對應的視圖。它們封裝了視圖可以附加到事件處理常式的邏輯,例如按鈕按下,並管理將這些事件發送到應用程式的資料層,在其中發生資料變更。
以下程式碼片段是名為 HomeViewModel 的視圖模型類別的類別宣告。其輸入是提供其資料的儲存庫。在此情況下,視圖模型依賴於 BookingRepository 和 UserRepository 作為引數。
class HomeViewModel {
  HomeViewModel({
    required BookingRepository bookingRepository,
    required UserRepository userRepository,
  }) :
    // Repositories are manually assigned because they're private members.
    _bookingRepository = bookingRepository,
    _userRepository = userRepository;

  final BookingRepository _bookingRepository;
  final UserRepository _userRepository;
  // ...
}
視圖模型始終依賴於資料儲存庫,這些儲存庫作為引數提供給視圖模型的建構函式。視圖模型和儲存庫具有多對多的關係,大多數視圖模型將依賴於多個儲存庫。
如先前的 HomeViewModel 範例宣告中所述,儲存庫應為視圖模型上的私有成員,否則視圖將可以直接存取應用程式的資料層。
UI 狀態
#視圖模型的輸出是視圖需要呈現的資料,通常稱為 UI 狀態,或簡稱狀態。UI 狀態是完全呈現視圖所需的資料的不可變快照。
視圖模型將狀態公開為公用成員。在以下程式碼範例中的視圖模型上,公開的資料是一個 User 物件,以及使用者的已儲存行程,這些行程以 List<TripSummary> 型別的物件公開。
class HomeViewModel {
  HomeViewModel({
   required BookingRepository bookingRepository,
   required UserRepository userRepository,
  }) : _bookingRepository = bookingRepository,
      _userRepository = userRepository;

  final BookingRepository _bookingRepository;
  final UserRepository _userRepository;

  User? _user;
  User? get user => _user;

  List<BookingSummary> _bookings = [];

  /// Items in an [UnmodifiableListView] can't be directly modified,
  /// but changes in the source list can be modified. Since _bookings
  /// is private and bookings is not, the view has no way to modify the
  /// list directly.
  UnmodifiableListView<BookingSummary> get bookings => UnmodifiableListView(_bookings);

  // ...
}
如前所述,UI 狀態應為不可變的。這是無錯誤軟體的關鍵部分。
羅盤應用程式使用 package:freezed 來強制資料類別的不可變性。例如,以下程式碼顯示 User 類別定義。freezed 提供深度不可變性,並為有用的方法(例如 copyWith 和 toJson)產生實作。
@freezed
class User with _$User {
  const factory User({
    /// The user's name.
    required String name,

    /// The user's picture URL.
    required String picture,
  }) = _User;

  factory User.fromJson(Map<String, Object?> json) => _$UserFromJson(json);
}更新 UI 狀態
#除了儲存狀態之外,視圖模型還需要在資料層提供新狀態時告知 Flutter 重新呈現視圖。在羅盤應用程式中,視圖模型延伸 ChangeNotifier 來實現此目的。
class HomeViewModel extends ChangeNotifier {
  HomeViewModel({
   required BookingRepository bookingRepository,
   required UserRepository userRepository,
  }) : _bookingRepository = bookingRepository,
      _userRepository = userRepository;
  final BookingRepository _bookingRepository;
  final UserRepository _userRepository;

  User? _user;
  User? get user => _user;

  List<BookingSummary> _bookings = [];
  List<BookingSummary> get bookings => _bookings;

  // ...
}
HomeViewModel.user 是視圖依賴的公用成員。當新資料從資料層流入且需要發出新狀態時,將呼叫 notifyListeners。
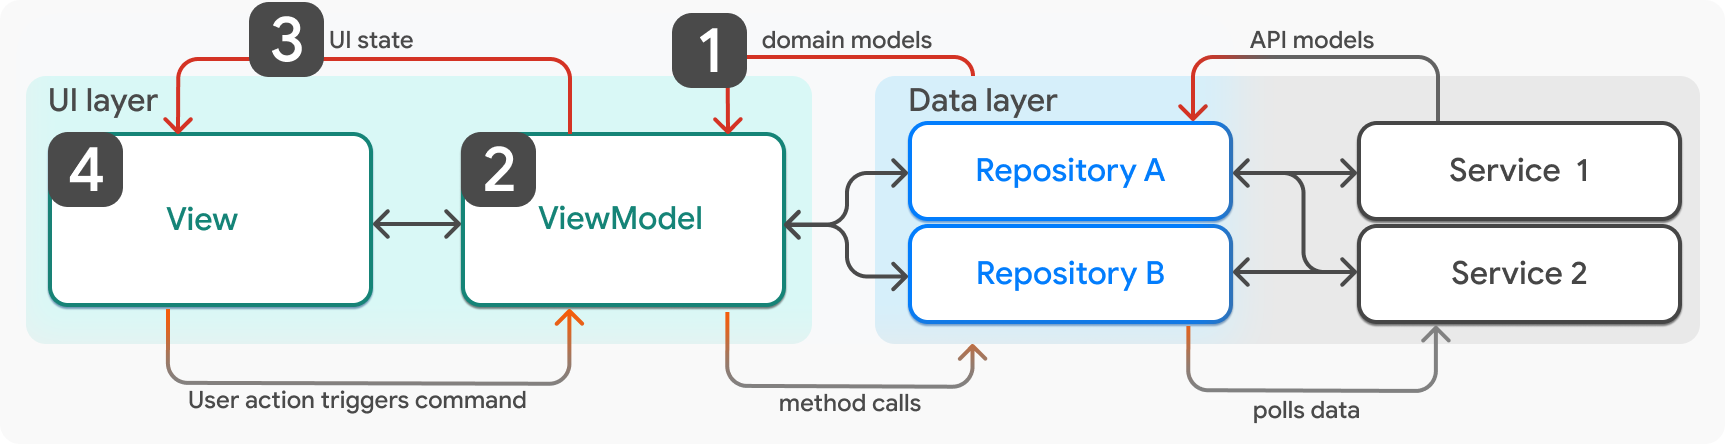
- 新的狀態從儲存庫提供給視圖模型。
- 視圖模型更新其 UI 狀態以反映新資料。
- 呼叫
ViewModel.notifyListeners,通知視圖新的 UI 狀態。 - 視圖(小工具)重新呈現。
例如,當使用者導覽到首頁螢幕並建立視圖模型時,會呼叫 _load 方法。在該方法完成之前,UI 狀態為空,視圖會顯示載入指示器。當 _load 方法完成時,如果成功,則視圖模型中會有新資料,並且必須通知視圖有新資料可用。
class HomeViewModel extends ChangeNotifier {
  // ...

 Future<Result> _load() async {
    try {
      final userResult = await _userRepository.getUser();
      switch (userResult) {
        case Ok<User>():
          _user = userResult.value;
          _log.fine('Loaded user');
        case Error<User>():
          _log.warning('Failed to load user', userResult.error);
      }

      // ...

      return userResult;
    } finally {
      notifyListeners();
    }
  }
}定義一個視圖
#視圖是應用程式中的小工具。通常,視圖代表應用程式中的一個螢幕,該螢幕有自己的路由,並在小工具子樹的頂部包含一個 Scaffold,例如 HomeScreen,但情況並非總是如此。
有時,視圖是一個單一的 UI 元素,它封裝了需要在整個應用程式中重複使用的功能。例如,羅盤應用程式有一個名為 LogoutButton 的視圖,可以將其放置在使用者可能會找到登出按鈕的任何小工具樹中。LogoutButton 視圖有自己的視圖模型,名為 LogoutViewModel。在較大的螢幕上,螢幕上可能會有多個視圖,這些視圖會在行動裝置上佔用整個螢幕。
視圖中的小工具有三個職責
- 它們顯示視圖模型中的資料屬性。
- 它們監聽視圖模型的更新,並在有新資料可用時重新呈現。
- 它們將視圖模型的呼叫回函附加到事件處理常式(如果適用)。
繼續使用「首頁」功能範例,以下程式碼顯示 HomeScreen 視圖的定義。
class HomeScreen extends StatelessWidget {
  const HomeScreen({super.key, required this.viewModel});

  final HomeViewModel viewModel;

  @override
  Widget build(BuildContext context) {
    return Scaffold(
      // ...
    );
  }
}
大多數情況下,視圖的唯一輸入應該是 key,所有 Flutter 小工具都將其作為可選引數,以及視圖對應的視圖模型。
在視圖中顯示 UI 資料
#視圖依賴視圖模型來取得其狀態。在羅盤應用程式中,視圖模型作為引數傳遞到視圖的建構函式中。以下範例程式碼片段來自 HomeScreen 小工具。
class HomeScreen extends StatelessWidget {
  const HomeScreen({super.key, required this.viewModel});

  final HomeViewModel viewModel;

  @override
  Widget build(BuildContext context) {
    // ...
  }
}
在小工具內,您可以從 viewModel 存取傳遞進來的預訂。在以下程式碼中,booking 屬性正在提供給子小工具。
@override
  Widget build(BuildContext context) {
    return Scaffold(
      // Some code was removed for brevity.
      body: SafeArea(
        child: ListenableBuilder(
          listenable: viewModel,
          builder: (context, _) {
            return CustomScrollView(
              slivers: [
                SliverToBoxAdapter(...),
                SliverList.builder(
                   itemCount: viewModel.bookings.length,
                    itemBuilder: (_, index) => _Booking(
                      key: ValueKey(viewModel.bookings[index].id),
                      booking:viewModel.bookings[index],
                      onTap: () => context.push(Routes.bookingWithId(
                         viewModel.bookings[index].id)),
                      onDismissed: (_) => viewModel.deleteBooking.execute(
                           viewModel.bookings[index].id,
                         ),
                    ),
                ),
              ],
            );
          },
        ),
      ),
更新 UI
#HomeScreen 小工具使用 ListenableBuilder 小工具監聽視圖模型的更新。當提供的 Listenable 變更時,ListenableBuilder 小工具下的所有小工具子樹都會重新呈現。在本例中,提供的 Listenable 是視圖模型。回想一下,視圖模型的類型是 ChangeNotifier,它是 Listenable 類型的子類型。
@override
Widget build(BuildContext context) {
  return Scaffold(
    // Some code was removed for brevity.
      body: SafeArea(
        child: ListenableBuilder(
          listenable: viewModel,
          builder: (context, _) {
            return CustomScrollView(
              slivers: [
                SliverToBoxAdapter(),
                SliverList.builder(
                  itemCount: viewModel.bookings.length,
                  itemBuilder: (_, index) =>
                      _Booking(
                        key: ValueKey(viewModel.bookings[index].id),
                        booking: viewModel.bookings[index],
                        onTap: () =>
                            context.push(Routes.bookingWithId(
                                viewModel.bookings[index].id)
                            ),
                        onDismissed: (_) =>
                            viewModel.deleteBooking.execute(
                              viewModel.bookings[index].id,
                            ),
                      ),
                ),
              ],
            );
          }
        )
      )
  );
}
處理使用者事件
#最後,視圖需要監聽使用者的事件,以便視圖模型可以處理這些事件。這可以透過在視圖模型類別上公開一個封裝所有邏輯的呼叫回函方法來實現。
在 HomeScreen 上,使用者可以透過滑動 Dismissible 小工具來刪除先前預訂的事件。
回想一下先前程式碼片段中的此程式碼
SliverList.builder(
  itemCount: widget.viewModel.bookings.length,
  itemBuilder: (_, index) => _Booking(
    key: ValueKey(viewModel.bookings[index].id),
    booking: viewModel.bookings[index],
    onTap: () => context.push(
      Routes.bookingWithId(viewModel.bookings[index].id)
    ),
    onDismissed: (_) =>
      viewModel.deleteBooking.execute(widget.viewModel.bookings[index].id),
  ),
),
在 HomeScreen 上,使用者的已儲存行程由 _Booking 小工具表示。當 _Booking 被取消時,將執行 viewModel.deleteBooking 方法。
已儲存的預訂是應用程式狀態,其持續時間超過會話或視圖的生命週期,並且只有儲存庫應修改此類應用程式狀態。因此,HomeViewModel.deleteBooking 方法會轉而呼叫資料層中儲存庫公開的方法,如下列程式碼片段所示。
Future<Result<void>> _deleteBooking(int id) async {
  try {
    final resultDelete = await _bookingRepository.delete(id);
    switch (resultDelete) {
      case Ok<void>():
        _log.fine('Deleted booking $id');
      case Error<void>():
        _log.warning('Failed to delete booking $id', resultDelete.error);
        return resultDelete;
    }

    // Some code was omitted for brevity.
    // final  resultLoadBookings = ...;

    return resultLoadBookings;
  } finally {
    notifyListeners();
  }
}
在羅盤應用程式中,這些處理使用者事件的方法稱為 命令。
命令物件
#命令負責從 UI 層開始並流回資料層的互動。在此應用程式中,Command 也是一種型別,可協助安全地更新 UI,而不論回應時間或內容為何。
Command 類別會封裝一個方法,並協助處理該方法的不同狀態,例如 running、complete 和 error。這些狀態可以輕鬆顯示不同的 UI,例如當 Command.running 為 true 時的載入指示器。
以下是來自 Command 類別的程式碼。為了演示目的,省略了一些程式碼。
abstract class Command<T> extends ChangeNotifier {
  Command();
  bool running = false;
  Result<T>? _result;

  /// true if action completed with error
  bool get error => _result is Error;

  /// true if action completed successfully
  bool get completed => _result is Ok;

  /// Internal execute implementation
  Future<void> _execute(action) async {
    if (_running) return;

    // Emit running state - e.g. button shows loading state
    _running = true;
    _result = null;
    notifyListeners();

    try {
      _result = await action();
    } finally {
      _running = false;
      notifyListeners();
    }
  }
}
Command 類別本身繼承自 ChangeNotifier,並且在 Command.execute 方法中,會多次呼叫 notifyListeners。這讓視圖(View)可以用極少的邏輯來處理不同的狀態,稍後您將在本頁看到範例。
您可能也注意到 Command 是一個抽象類別。它由具體的類別實作,例如 Command0 和 Command1。類別名稱中的整數指的是底層方法所預期的參數數量。您可以在 Compass 應用程式的 utils 目錄中看到這些實作類別的範例。
確保視圖在資料存在之前可以渲染
#在視圖模型類別中,命令是在建構函式中建立的。
class HomeViewModel extends ChangeNotifier {
  HomeViewModel({
   required BookingRepository bookingRepository,
   required UserRepository userRepository,
  }) : _bookingRepository = bookingRepository,
      _userRepository = userRepository {
    // Load required data when this screen is built.
    load = Command0(_load)..execute();
    deleteBooking = Command1(_deleteBooking);
  }

  final BookingRepository _bookingRepository;
  final UserRepository _userRepository;

  late Command0 load;
  late Command1<void, int> deleteBooking;

  User? _user;
  User? get user => _user;

  List<BookingSummary> _bookings = [];
  List<BookingSummary> get bookings => _bookings;

  Future<Result> _load() async {
    // ...
  }

  Future<Result<void>> _deleteBooking(int id) async {
    // ...
  }

  // ...
}
Command.execute 方法是異步的,因此它無法保證當視圖想要渲染時,資料會是可用的。這說明了 Compass 應用程式為何使用 Commands。在視圖的 Widget.build 方法中,命令被用來條件性地渲染不同的 Widget。
// ...
child: ListenableBuilder(
  listenable: viewModel.load,
  builder: (context, child) {
    if (viewModel.load.running) {
      return const Center(child: CircularProgressIndicator());
    }

    if (viewModel.load.error) {
      return ErrorIndicator(
        title: AppLocalization.of(context).errorWhileLoadingHome,
        label: AppLocalization.of(context).tryAgain,
          onPressed: viewModel.load.execute,
        );
     }

    // The command has completed without error.
    // Return the main view widget.
    return child!;
  },
),

// ...
因為 load 命令是視圖模型上的一個屬性,而不是暫時性的東西,所以 load 方法何時被呼叫或何時解析並不重要。例如,如果 load 命令在 HomeScreen Widget 被建立之前解析,這不是問題,因為 Command 物件仍然存在,並且會公開正確的狀態。
此模式標準化了應用程式中常見 UI 問題的解決方式,使您的程式碼庫更不容易出錯且更具可擴展性,但並非每個應用程式都想要實作此模式。您是否要使用它,很大程度上取決於您做出的其他架構選擇。許多幫助您管理狀態的函式庫都有自己的工具來解決這些問題。例如,如果您要在您的應用程式中使用 streams 和 StreamBuilders,Flutter 提供的 AsyncSnapshot 類別內建了此功能。
回饋
#由於網站的此部分正在不斷發展,我們歡迎您的回饋!
除非另有說明,否則本網站上的文件反映的是 Flutter 的最新穩定版本。此頁面最後更新於 2024-12-04。 檢視原始碼 或 回報問題。