在列表上方放置浮動應用程式列
為了讓使用者更容易查看項目清單,您可能希望在使用者向下捲動清單時隱藏應用程式列。如果您的應用程式顯示佔據大量垂直空間的「高」應用程式列,則尤其如此。
通常,您會透過將 appBar 屬性提供給 Scaffold Widget 來建立應用程式列。這會建立一個固定的應用程式列,該應用程式列始終保留在 Scaffold 的 body 上方。
將應用程式列從 Scaffold 小部件移至 CustomScrollView 中,您可以建立一個應用程式列,當您捲動 CustomScrollView 內包含的項目清單時,該應用程式列會滾動到螢幕外。
此食譜示範如何使用 CustomScrollView 顯示項目清單,並在頂部顯示一個應用程式列,當使用者向下捲動清單時,該應用程式列會滾動到螢幕外,方法如下:
- 建立一個
CustomScrollView。 - 使用
SliverAppBar加入浮動應用程式列。 - 使用
SliverList加入項目清單。
1. 建立一個 CustomScrollView
#若要建立浮動應用程式列,請將應用程式列放置在也包含項目清單的 CustomScrollView 內。這會同步應用程式列和項目清單的捲動位置。您可以將 CustomScrollView 小部件視為 ListView,它允許您混合和比對不同類型的可捲動清單和小部件。
提供給 CustomScrollView 的可捲動清單和小部件稱為滑片(slivers)。滑片有多種類型,例如 SliverList、SliverGrid 和 SliverAppBar。事實上,ListView 和 GridView 小部件使用 SliverList 和 SliverGrid 小部件來實作捲動。
在此範例中,請建立一個包含 SliverAppBar 和 SliverList 的 CustomScrollView。此外,請移除您提供給 Scaffold 小部件的任何應用程式列。
Scaffold(
// No appBar property provided, only the body.
body: CustomScrollView(
// Add the app bar and list of items as slivers in the next steps.
slivers: <Widget>[]),
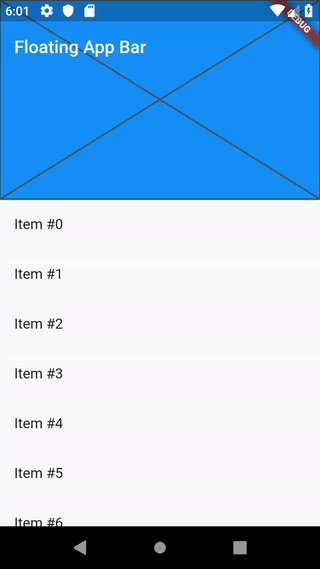
);2. 使用 SliverAppBar 加入浮動應用程式列
#接下來,將應用程式列加入 CustomScrollView 中。Flutter 提供了 SliverAppBar 小部件,它與一般的 AppBar 小部件非常相似,使用 SliverAppBar 來顯示標題、標籤、影像等等。
然而,SliverAppBar 還能讓您建立一個「浮動」應用程式列,當使用者向下捲動清單時,該應用程式列會滾動到螢幕外。此外,您可以設定 SliverAppBar 在使用者捲動時縮放。
若要建立此效果
- 從只顯示標題的應用程式列開始。
- 將
floating屬性設為true。這允許使用者在向上捲動清單時快速顯示應用程式列。 - 加入一個
flexibleSpace小部件,它會填滿可用的expandedHeight。
CustomScrollView(
  slivers: [
    // Add the app bar to the CustomScrollView.
    const SliverAppBar(
      // Provide a standard title.
      title: Text(title),
      // Allows the user to reveal the app bar if they begin scrolling
      // back up the list of items.
      floating: true,
      // Display a placeholder widget to visualize the shrinking size.
      flexibleSpace: Placeholder(),
      // Make the initial height of the SliverAppBar larger than normal.
      expandedHeight: 200,
    ),
  ],
)3. 使用 SliverList 加入項目清單
#現在您已經有了應用程式列,請將項目清單加入 CustomScrollView 中。您有兩個選項:SliverList 或 SliverGrid。如果您需要依序顯示項目清單,請使用 SliverList 小部件。如果您需要顯示網格清單,請使用 SliverGrid 小部件。
SliverList 和 SliverGrid 小部件採用一個必要參數:SliverChildDelegate,它會為 SliverList 或 SliverGrid 提供小部件清單。例如,SliverChildBuilderDelegate 可讓您建立一個在捲動時延遲建立的項目清單,就像 ListView.builder 小部件一樣。
// Next, create a SliverList
SliverList(
  // Use a delegate to build items as they're scrolled on screen.
  delegate: SliverChildBuilderDelegate(
    // The builder function returns a ListTile with a title that
    // displays the index of the current item.
    (context, index) => ListTile(title: Text('Item #$index')),
    // Builds 1000 ListTiles
    childCount: 1000,
  ),
)
互動式範例
#import 'package:flutter/material.dart';
void main() => runApp(const MyApp());
class MyApp extends StatelessWidget {
const MyApp({super.key});
@override
Widget build(BuildContext context) {
const title = 'Floating App Bar';
return MaterialApp(
title: title,
home: Scaffold(
// No appbar provided to the Scaffold, only a body with a
// CustomScrollView.
body: CustomScrollView(
slivers: [
// Add the app bar to the CustomScrollView.
const SliverAppBar(
// Provide a standard title.
title: Text(title),
// Allows the user to reveal the app bar if they begin scrolling
// back up the list of items.
floating: true,
// Display a placeholder widget to visualize the shrinking size.
flexibleSpace: Placeholder(),
// Make the initial height of the SliverAppBar larger than normal.
expandedHeight: 200,
),
// Next, create a SliverList
SliverList(
// Use a delegate to build items as they're scrolled on screen.
delegate: SliverChildBuilderDelegate(
// The builder function returns a ListTile with a title that
// displays the index of the current item.
(context, index) => ListTile(title: Text('Item #$index')),
// Builds 1000 ListTiles
childCount: 1000,
),
),
],
),
),
);
}
}
除非另有說明,否則本網站上的文件反映了 Flutter 的最新穩定版本。頁面上次更新時間為 2024-06-26。 查看原始碼 或 回報問題。