適用於外掛程式作者的 Swift Package Manager
Flutter 的 Swift Package Manager 整合有以下幾個好處
- 存取 Swift 套件生態系統。Flutter 外掛程式可以使用不斷成長的 Swift 套件 生態系統!
- 簡化 Flutter 安裝。Swift Package Manager 與 Xcode 捆綁在一起。未來,您不需要安裝 Ruby 和 CocoaPods 就能以 iOS 或 macOS 為目標。
如果您在 Flutter 的 Swift Package Manager 支援中發現錯誤,請開啟一個 issue。
如何開啟 Swift Package Manager
#Flutter 的 Swift Package Manager 支援預設為關閉。若要開啟它,請執行以下操作
切換到 Flutter 的
main頻道shflutter channel main --no-cache-artifacts升級到最新的 Flutter SDK 並下載成品
shflutter upgrade開啟 Swift Package Manager 功能
shflutter config --enable-swift-package-manager
使用 Flutter CLI 執行應用程式會遷移專案以新增 Swift Package Manager 整合。這會讓您的專案下載 Flutter 外掛程式所依賴的 Swift 套件。具有 Swift Package Manager 整合的應用程式需要 Flutter 3.24 或更高版本。若要使用舊版的 Flutter,您需要從應用程式移除 Swift Package Manager 整合。
對於尚不支援 Swift Package Manager 的相依性,Flutter 會退回使用 CocoaPods。
如何關閉 Swift Package Manager
#停用 Swift Package Manager 會導致 Flutter 為所有相依性使用 CocoaPods。但是,Swift Package Manager 仍然會與您的專案整合。若要從專案中完全移除 Swift Package Manager 整合,請依照如何移除 Swift Package Manager 整合的指示操作。
針對單一專案關閉
#在專案的 pubspec.yaml 檔案中,於 flutter 區段下,新增 disable-swift-package-manager: true。
# The following section is specific to Flutter packages.
flutter:
  disable-swift-package-manager: true
這會為此專案的所有貢獻者關閉 Swift Package Manager。
針對所有專案全域關閉
#執行以下命令
flutter config --no-enable-swift-package-manager這會為目前使用者關閉 Swift Package Manager。
如果專案與 Swift Package Manager 不相容,所有貢獻者都需要執行此命令。
如何將 Swift Package Manager 支援新增至現有的 Flutter 外掛程式
#本指南說明如何將 Swift Package Manager 支援新增至已支援 CocoaPods 的外掛程式。這可確保所有 Flutter 專案都能使用該外掛程式。
在另行通知之前,Flutter 外掛程式應支援Swift Package Manager和 CocoaPods。
Swift Package Manager 的採用將會是漸進式的。尚未遷移到 Swift Package Manager 的專案將無法使用不支援 CocoaPods 的外掛程式。不支援 Swift Package Manager 的外掛程式可能會對已遷移的專案造成問題。
在本指南中,將 plugin_name 取代為您的外掛程式名稱。以下範例使用 ios,請視情況將 ios 取代為 macos/darwin。
首先在
ios、macos和/或darwin目錄下建立目錄。將此新目錄命名為平台套件的名稱。plugin_name/ios/ ├── ... └── plugin_name/
在此新目錄中,建立以下檔案/目錄
Package.swift(檔案)Sources(目錄)Sources/plugin_name(目錄)
您的外掛程式應如下所示
plugin_name/ios/ ├── ... └── plugin_name/ ├── Package.swift └── Sources/plugin_name/
在
Package.swift檔案中使用以下範本Package.swiftswift// swift-tools-version: 5.9 // The swift-tools-version declares the minimum version of Swift required to build this package. import PackageDescription let package = Package( // TODO: Update your plugin name. name: "plugin_name", platforms: [ // TODO: Update the platforms your plugin supports. // If your plugin only supports iOS, remove `.macOS(...)`. // If your plugin only supports macOS, remove `.iOS(...)`. .iOS("12.0"), .macOS("10.14") ], products: [ // TODO: Update your library and target names. // If the plugin name contains "_", replace with "-" for the library name. .library(name: "plugin-name", targets: ["plugin_name"]) ], dependencies: [], targets: [ .target( // TODO: Update your target name. name: "plugin_name", dependencies: [], resources: [ // TODO: If your plugin requires a privacy manifest // (e.g. if it uses any required reason APIs), update the PrivacyInfo.xcprivacy file // to describe your plugin's privacy impact, and then uncomment this line. // For more information, see: // https://developer.apple.com/documentation/bundleresources/privacy_manifest_files // .process("PrivacyInfo.xcprivacy"), // TODO: If you have other resources that need to be bundled with your plugin, refer to // the following instructions to add them: // https://developer.apple.com/documentation/xcode/bundling-resources-with-a-swift-package ] ) ] )更新
Package.swift檔案中的支援的平台。Package.swiftswiftplatforms: [ // TODO: Update the platforms your plugin supports. // If your plugin only supports iOS, remove `.macOS(...)`. // If your plugin only supports macOS, remove `.iOS(...)`. .iOS("12.0"), .macOS("10.14") ],更新
Package.swift檔案中的套件、程式庫和目標名稱。Package.swiftswiftlet package = Package( // TODO: Update your plugin name. name: "plugin_name", platforms: [ .iOS("12.0"), .macOS("10.14") ], products: [ // TODO: Update your library and target names. // If the plugin name contains "_", replace with "-" for the library name .library(name: "plugin-name", targets: ["plugin_name"]) ], dependencies: [], targets: [ .target( // TODO: Update your target name. name: "plugin_name", dependencies: [], resources: [ // TODO: If your plugin requires a privacy manifest // (e.g. if it uses any required reason APIs), update the PrivacyInfo.xcprivacy file // to describe your plugin's privacy impact, and then uncomment this line. // For more information, see: // https://developer.apple.com/documentation/bundleresources/privacy_manifest_files // .process("PrivacyInfo.xcprivacy"), // TODO: If you have other resources that need to be bundled with your plugin, refer to // the following instructions to add them: // https://developer.apple.com/documentation/xcode/bundling-resources-with-a-swift-package ] ) ] )如果您的外掛程式具有
PrivacyInfo.xcprivacy檔案,請將其移至ios/plugin_name/Sources/plugin_name/PrivacyInfo.xcprivacy並取消註解Package.swift檔案中的資源。Package.swiftswiftresources: [ // TODO: If your plugin requires a privacy manifest // (e.g. if it uses any required reason APIs), update the PrivacyInfo.xcprivacy file // to describe your plugin's privacy impact, and then uncomment this line. // For more information, see: // https://developer.apple.com/documentation/bundleresources/privacy_manifest_files .process("PrivacyInfo.xcprivacy"), // TODO: If you have other resources that need to be bundled with your plugin, refer to // the following instructions to add them: // https://developer.apple.com/documentation/xcode/bundling-resources-with-a-swift-package ],將所有資源檔案從
ios/Assets移至ios/plugin_name/Sources/plugin_name(或子目錄)。如果適用,請將資源檔案新增至您的Package.swift檔案。如需更多說明,請參閱 https://developer.apple.com/documentation/xcode/bundling-resources-with-a-swift-package。將所有檔案從
ios/Classes移至ios/plugin_name/Sources/plugin_name。ios/Assets、ios/Resources和ios/Classes目錄現在應該是空的,並且可以刪除。如果您的外掛程式使用 Pigeon,請更新您的 Pigeon 輸入檔案。
pigeons/messages.dartdartkotlinOptions: KotlinOptions(), javaOut: 'android/app/src/main/java/io/flutter/plugins/Messages.java', javaOptions: JavaOptions(), swiftOut: 'ios/Classes/messages.g.swift', swiftOut: 'ios/plugin_name/Sources/plugin_name/messages.g.swift', swiftOptions: SwiftOptions(),使用您可能需要的任何自訂項目來更新您的
Package.swift檔案。在 Xcode 中開啟
ios/plugin_name/目錄。在 Xcode 中,開啟您的
Package.swift檔案。確認 Xcode 未針對此檔案產生任何警告或錯誤。如果您的
ios/plugin_name.podspec檔案具有 CocoaPodsdependency,請將對應的 Swift Package Manager 相依性新增至您的Package.swift檔案。如果您的套件必須明確連結
static或dynamic(Apple 不建議),請更新 Product 以定義類型Package.swiftswiftproducts: [ .library(name: "plugin-name", type: .static, targets: ["plugin_name"]) ],進行任何其他自訂。如需有關如何撰寫
Package.swift檔案的詳細資訊,請參閱 https://developer.apple.com/documentation/packagedescription。
更新您的
ios/plugin_name.podspec以指向新的路徑。ios/plugin_name.podspecrubys.source_files = 'Classes/**/*.swift' s.resource_bundles = {'plugin_name_privacy' => ['Resources/PrivacyInfo.xcprivacy']} s.source_files = 'plugin_name/Sources/plugin_name/**/*.swift' s.resource_bundles = {'plugin_name_privacy' => ['plugin_name/Sources/plugin_name/PrivacyInfo.xcprivacy']}更新從套件載入資源的方式,以使用
Bundle.module。swift#if SWIFT_PACKAGE let settingsURL = Bundle.module.url(forResource: "image", withExtension: "jpg") #else let settingsURL = Bundle(for: Self.self).url(forResource: "image", withExtension: "jpg") #endif將外掛程式的變更提交至您的版本控制系統。
確認外掛程式仍然可以使用 CocoaPods。
關閉 Swift Package Manager。
shflutter config --no-enable-swift-package-manager導覽至外掛程式的範例應用程式。
shcd path/to/plugin/example/確保外掛程式的範例應用程式可以建置和執行。
shflutter run導覽至外掛程式的頂層目錄。
shcd path/to/plugin/執行 CocoaPods 驗證程式碼檢查。
shpod lib lint ios/plugin_name.podspec --configuration=Debug --skip-tests --use-modular-headers --use-librariesshpod lib lint ios/plugin_name.podspec --configuration=Debug --skip-tests --use-modular-headers
確認外掛程式可以使用 Swift Package Manager。
開啟 Swift Package Manager。
shflutter config --enable-swift-package-manager導覽至外掛程式的範例應用程式。
shcd path/to/plugin/example/確保外掛程式的範例應用程式可以建置和執行。
shflutter run在 Xcode 中開啟外掛程式的範例應用程式。確保左側的專案導覽器中顯示套件相依性。
確認測試通過。
如果您的外掛程式具有原生單元測試 (XCTest),請確保您也更新外掛程式範例應用程式中的單元測試。
依照測試外掛程式的指示操作。
在本指南中,將 plugin_name 取代為您的外掛程式名稱。以下範例使用 ios,請視情況將 ios 取代為 macos/darwin。
首先在
ios、macos和/或darwin目錄下建立目錄。將此新目錄命名為平台套件的名稱。plugin_name/ios/ ├── ... └── plugin_name/
在此新目錄中,建立以下檔案/目錄
Package.swift(檔案)Sources(目錄)Sources/plugin_name(目錄)Sources/plugin_name/include(目錄)Sources/plugin_name/include/plugin_name(目錄)Sources/plugin_name/include/plugin_name/.gitkeep(檔案)- 此檔案可確保目錄已提交。如果其他檔案新增至目錄,您可以移除
.gitkeep檔案。
- 此檔案可確保目錄已提交。如果其他檔案新增至目錄,您可以移除
您的外掛程式應如下所示
plugin_name/ios/ ├── ... └── plugin_name/ ├── Package.swift └── Sources/plugin_name/include/plugin_name/ └── .gitkeep在
Package.swift檔案中使用以下範本Package.swiftswift// swift-tools-version: 5.9 // The swift-tools-version declares the minimum version of Swift required to build this package. import PackageDescription let package = Package( // TODO: Update your plugin name. name: "plugin_name", platforms: [ // TODO: Update the platforms your plugin supports. // If your plugin only supports iOS, remove `.macOS(...)`. // If your plugin only supports macOS, remove `.iOS(...)`. .iOS("12.0"), .macOS("10.14") ], products: [ // TODO: Update your library and target names. // If the plugin name contains "_", replace with "-" for the library name .library(name: "plugin-name", targets: ["plugin_name"]) ], dependencies: [], targets: [ .target( // TODO: Update your target name. name: "plugin_name", dependencies: [], resources: [ // TODO: If your plugin requires a privacy manifest // (e.g. if it uses any required reason APIs), update the PrivacyInfo.xcprivacy file // to describe your plugin's privacy impact, and then uncomment this line. // For more information, see: // https://developer.apple.com/documentation/bundleresources/privacy_manifest_files // .process("PrivacyInfo.xcprivacy"), // TODO: If you have other resources that need to be bundled with your plugin, refer to // the following instructions to add them: // https://developer.apple.com/documentation/xcode/bundling-resources-with-a-swift-package ], cSettings: [ // TODO: Update your plugin name. .headerSearchPath("include/plugin_name") ] ) ] )更新
Package.swift檔案中的支援的平台。Package.swiftswiftplatforms: [ // TODO: Update the platforms your plugin supports. // If your plugin only supports iOS, remove `.macOS(...)`. // If your plugin only supports macOS, remove `.iOS(...)`. .iOS("12.0"), .macOS("10.14") ],更新
Package.swift檔案中的套件、程式庫和目標名稱。Package.swiftswiftlet package = Package( // TODO: Update your plugin name. name: "plugin_name", platforms: [ .iOS("12.0"), .macOS("10.14") ], products: [ // TODO: Update your library and target names. // If the plugin name contains "_", replace with "-" for the library name .library(name: "plugin-name", targets: ["plugin_name"]) ], dependencies: [], targets: [ .target( // TODO: Update your target name. name: "plugin_name", dependencies: [], resources: [ // TODO: If your plugin requires a privacy manifest // (e.g. if it uses any required reason APIs), update the PrivacyInfo.xcprivacy file // to describe your plugin's privacy impact, and then uncomment this line. // For more information, see: // https://developer.apple.com/documentation/bundleresources/privacy_manifest_files // .process("PrivacyInfo.xcprivacy"), // TODO: If you have other resources that need to be bundled with your plugin, refer to // the following instructions to add them: // https://developer.apple.com/documentation/xcode/bundling-resources-with-a-swift-package ], cSettings: [ // TODO: Update your plugin name. .headerSearchPath("include/plugin_name") ] ) ] )如果您的外掛程式具有
PrivacyInfo.xcprivacy檔案,請將其移至ios/plugin_name/Sources/plugin_name/PrivacyInfo.xcprivacy並取消註解Package.swift檔案中的資源。Package.swiftswiftresources: [ // TODO: If your plugin requires a privacy manifest // (e.g. if it uses any required reason APIs), update the PrivacyInfo.xcprivacy file // to describe your plugin's privacy impact, and then uncomment this line. // For more information, see: // https://developer.apple.com/documentation/bundleresources/privacy_manifest_files .process("PrivacyInfo.xcprivacy"), // TODO: If you have other resources that need to be bundled with your plugin, refer to // the following instructions to add them: // https://developer.apple.com/documentation/xcode/bundling-resources-with-a-swift-package ],將所有資源檔案從
ios/Assets移至ios/plugin_name/Sources/plugin_name(或子目錄)。如果適用,請將資源檔案新增至您的Package.swift檔案。如需更多說明,請參閱 https://developer.apple.com/documentation/xcode/bundling-resources-with-a-swift-package。將所有公用標頭從
ios/Classes移至ios/plugin_name/Sources/plugin_name/include/plugin_name。如果您不確定哪些標頭是公用的,請檢查
podspec檔案的public_header_files屬性。如果未指定此屬性,則您的所有標頭都是公用的。您應該考慮是否要讓所有標頭都是公用的。在您的
pubspec.yaml檔案中定義的pluginClass必須是公用的,並且位於此目錄中。
處理
modulemap。如果您的外掛程式沒有
modulemap,請跳過此步驟。如果您使用
modulemap讓 CocoaPods 建立測試子模組,請考慮為 Swift Package Manager 移除它。請注意,這會讓所有公用標頭都可透過模組取得。若要為 Swift Package Manager 移除
modulemap,但為 CocoaPods 保留它,請在外掛程式的Package.swift檔案中排除modulemap和 umbrella 標頭。以下範例假設
modulemap和 umbrella 標頭位於ios/plugin_name/Sources/plugin_name/include目錄中。Package.swiftswift.target( name: "plugin_name", dependencies: [], exclude: ["include/cocoapods_plugin_name.modulemap", "include/plugin_name-umbrella.h"],如果您想要讓單元測試與 CocoaPods 和 Swift Package Manager 都相容,您可以嘗試以下操作
Tests/TestFile.mobjc@import plugin_name; @import plugin_name.Test; #if __has_include(<plugin_name/plugin_name-umbrella.h>) @import plugin_name.Test; #endif如果您想要在 Swift 套件中使用自訂
modulemap,請參閱Swift Package Manager 的文件。將所有其餘檔案從
ios/Classes移至ios/plugin_name/Sources/plugin_name。ios/Assets、ios/Resources和ios/Classes目錄現在應該是空的,並且可以刪除。如果您的標頭檔案不再與您的實作檔案位於相同的目錄中,您應該更新您的 import 陳述式。
例如,假設以下遷移
之前
ios/Classes/
├── PublicHeaderFile.h
└── ImplementationFile.m
之後
ios/plugin_name/Sources/plugin_name/
└── include/plugin_name/
   └── PublicHeaderFile.h
└── ImplementationFile.m
在此範例中,應該更新
ImplementationFile.m中的 import 陳述式Sources/plugin_name/ImplementationFile.mobjc#import "PublicHeaderFile.h" #import "./include/plugin_name/PublicHeaderFile.h"如果您的外掛程式使用 Pigeon,請更新您的 Pigeon 輸入檔案。
pigeons/messages.dartdartjavaOptions: JavaOptions(), objcHeaderOut: 'ios/Classes/messages.g.h', objcSourceOut: 'ios/Classes/messages.g.m', objcHeaderOut: 'ios/plugin_name/Sources/plugin_name/messages.g.h', objcSourceOut: 'ios/plugin_name/Sources/plugin_name/messages.g.m', copyrightHeader: 'pigeons/copyright.txt',如果您的
objcHeaderOut檔案不再與objcSourceOut位於相同的目錄中,您可以使用ObjcOptions.headerIncludePath來變更#importpigeons/messages.dartdartjavaOptions: JavaOptions(), objcHeaderOut: 'ios/Classes/messages.g.h', objcSourceOut: 'ios/Classes/messages.g.m', objcHeaderOut: 'ios/plugin_name/Sources/plugin_name/include/plugin_name/messages.g.h', objcSourceOut: 'ios/plugin_name/Sources/plugin_name/messages.g.m', objcOptions: ObjcOptions( headerIncludePath: './include/plugin_name/messages.g.h', ), copyrightHeader: 'pigeons/copyright.txt',執行 Pigeon 以使用最新的配置重新產生程式碼。
使用您可能需要的任何自訂項目來更新您的
Package.swift檔案。在 Xcode 中開啟
ios/plugin_name/目錄。在 Xcode 中,開啟您的
Package.swift檔案。確認 Xcode 未針對此檔案產生任何警告或錯誤。如果您的
ios/plugin_name.podspec檔案具有 CocoaPodsdependency,請將對應的 Swift Package Manager 相依性新增至您的Package.swift檔案。如果您的套件必須明確連結
static或dynamic(Apple 不建議),請更新 Product 以定義類型Package.swiftswiftproducts: [ .library(name: "plugin-name", type: .static, targets: ["plugin_name"]) ],進行任何其他自訂。如需有關如何撰寫
Package.swift檔案的詳細資訊,請參閱 https://developer.apple.com/documentation/packagedescription。
更新您的
ios/plugin_name.podspec以指向新的路徑。ios/plugin_name.podspecrubys.source_files = 'Classes/**/*.{h,m}' s.public_header_files = 'Classes/**/*.h' s.module_map = 'Classes/cocoapods_plugin_name.modulemap' s.resource_bundles = {'plugin_name_privacy' => ['Resources/PrivacyInfo.xcprivacy']} s.source_files = 'plugin_name/Sources/plugin_name/**/*.{h,m}' s.public_header_files = 'plugin_name/Sources/plugin_name/include/**/*.h' s.module_map = 'plugin_name/Sources/plugin_name/include/cocoapods_plugin_name.modulemap' s.resource_bundles = {'plugin_name_privacy' => ['plugin_name/Sources/plugin_name/PrivacyInfo.xcprivacy']}更新從 bundle 加載資源的方式,改為使用
SWIFTPM_MODULE_BUNDLEobjc#if SWIFT_PACKAGE NSBundle *bundle = SWIFTPM_MODULE_BUNDLE; #else NSBundle *bundle = [NSBundle bundleForClass:[self class]]; #endif NSURL *imageURL = [bundle URLForResource:@"image" withExtension:@"jpg"];如果您的
ios/plugin_name/Sources/plugin_name/include目錄僅包含一個.gitkeep檔案,您需要更新您的.gitignore以包含以下內容.gitignoretext!.gitkeep執行
flutter pub publish --dry-run以確保include目錄被發佈。將外掛程式的變更提交至您的版本控制系統。
確認外掛程式仍然可以使用 CocoaPods。
關閉 Swift Package Manager
shflutter config --no-enable-swift-package-manager導覽至外掛程式的範例應用程式。
shcd path/to/plugin/example/確保外掛程式的範例應用程式可以建置和執行。
shflutter run導覽至外掛程式的頂層目錄。
shcd path/to/plugin/執行 CocoaPods 驗證檢查
shpod lib lint ios/plugin_name.podspec --configuration=Debug --skip-tests --use-modular-headers --use-librariesshpod lib lint ios/plugin_name.podspec --configuration=Debug --skip-tests --use-modular-headers
確認外掛程式可以使用 Swift Package Manager。
開啟 Swift Package Manager
shflutter config --enable-swift-package-manager導覽至外掛程式的範例應用程式。
shcd path/to/plugin/example/確保外掛程式的範例應用程式可以建置和執行。
shflutter run在 Xcode 中開啟外掛程式的範例應用程式。確保左側的專案導覽器中顯示套件相依性。
確認測試通過。
如果您的外掛程式具有原生單元測試 (XCTest),請確保您也更新外掛程式範例應用程式中的單元測試。
依照測試外掛程式的指示操作。
如何更新外掛程式範例應用程式中的單元測試
#如果您的外掛程式有原生 XCTests,當以下其中一種情況為真時,您可能需要更新它們以使用 Swift Package Manager
- 您正在為測試使用 CocoaPod 依賴項。
- 您的外掛程式在其
Package.swift檔案中被明確設定為type: .dynamic。
若要更新您的單元測試
在 Xcode 中開啟您的
example/ios/Runner.xcworkspace。如果您之前使用 CocoaPod 依賴項進行測試,例如
OCMock,您需要將其從您的Podfile檔案中移除。ios/Podfilerubytarget 'RunnerTests' do inherit! :search_paths pod 'OCMock', '3.5' end然後在終端機中,在
plugin_name_ios/example/ios目錄中執行pod install。導覽至專案的 Package Dependencies。

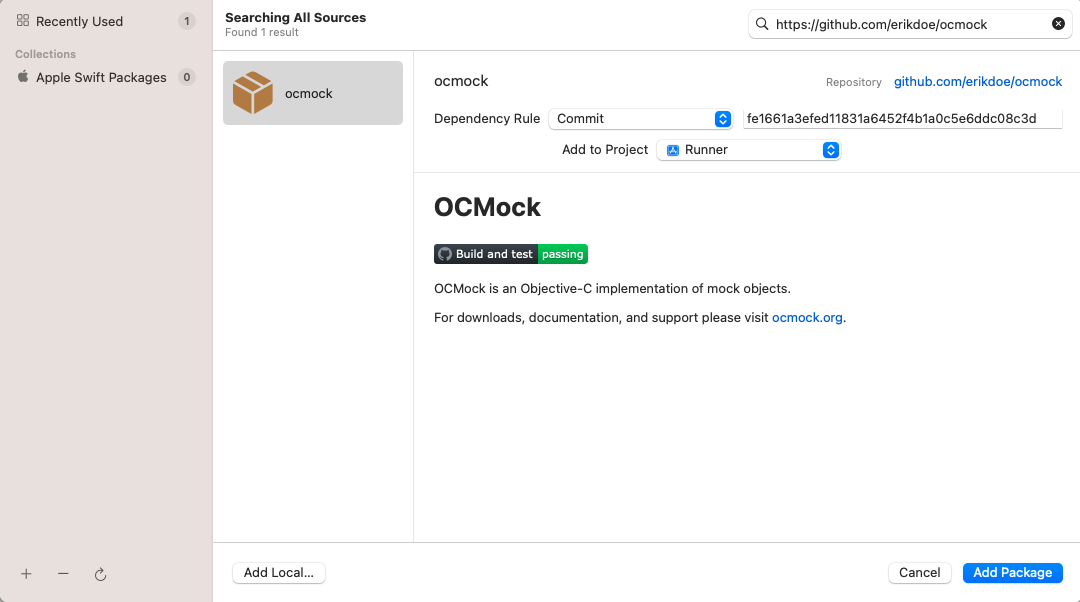
專案的套件依賴項 點擊 + 按鈕,並透過在右上角的搜尋欄中搜尋來添加任何僅用於測試的依賴項。

搜尋僅用於測試的依賴項 確保依賴項已添加到
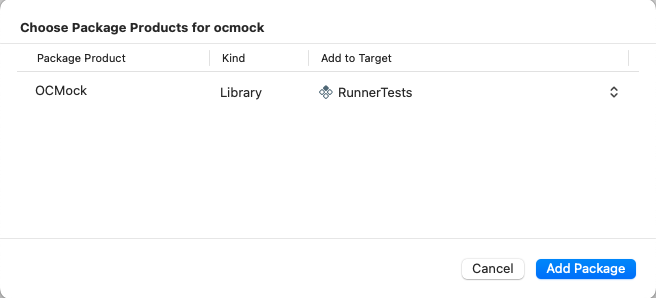
RunnerTests目標中。
確保依賴項已添加到 RunnerTests目標點擊 Add Package 按鈕。
如果您已在您的外掛程式的
Package.swift檔案中將其程式庫類型明確設定為.dynamic(Apple 不建議使用),您也需要將其作為依賴項添加到RunnerTests目標中。確保
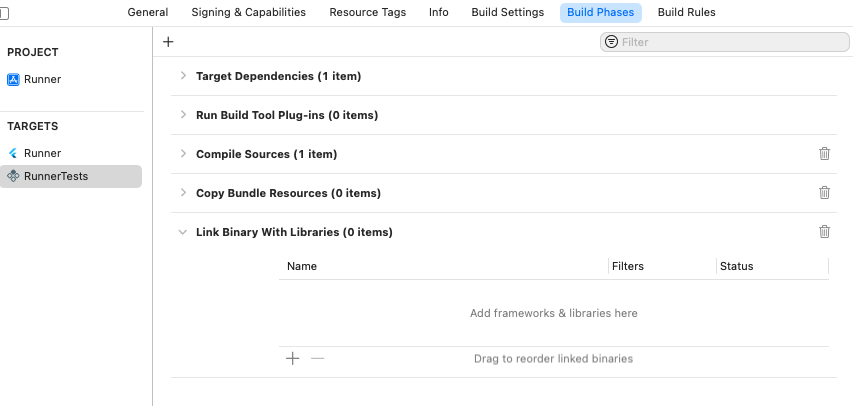
RunnerTests的 Build Phases 有一個 Link Binary With Libraries 建置階段
RunnerTests目標中的Link Binary With Libraries建置階段如果建置階段尚不存在,請建立一個。點擊 add,然後點擊 New Link Binary With Libraries Phase。

新增 Link Binary With Libraries建置階段導覽至專案的 Package Dependencies。
點擊 add。
在開啟的對話框中,點擊 Add Local... 按鈕。
導覽至
plugin_name/plugin_name_ios/ios/plugin_name_ios並點擊 Add Package 按鈕。確保其已添加到
RunnerTests目標中,並點擊 Add Package 按鈕。
確保測試通過 Product > Test。
除非另有說明,本網站上的文件反映了 Flutter 的最新穩定版本。頁面最後更新於 2024-12-04。 檢視來源 或 回報問題。