設定 iOS 的通用連結
深度連結允許應用程式使用者使用 URI 啟動應用程式。此 URI 包含協定、主機和路徑,並將應用程式開啟到特定畫面。
通用連結是一種 iOS 裝置獨有的深度連結,僅使用 http 或 https 協定。
若要設定通用連結,您需要擁有一個網域名稱。作為臨時解決方案,請考慮使用 Firebase Hosting 或 GitHub Pages。
建立或修改 Flutter 應用程式
#撰寫一個可以處理傳入 URL 的 Flutter 應用程式。
這個範例使用 go_router 套件來處理路由。Flutter 團隊維護 go_router 套件。它提供了一個簡單的 API 來處理複雜的路由情境。
若要建立新的應用程式,請輸入
flutter create <app-name>。flutter create deeplink_cookbook若要將
go_router套件作為依賴項加入,請執行flutter pub addflutter pub add go_router若要處理路由,請在
main.dart檔案中建立一個GoRouter物件main.dartdartimport 'package:flutter/material.dart'; import 'package:go_router/go_router.dart'; void main() => runApp(MaterialApp.router(routerConfig: router)); /// This handles '/' and '/details'. final router = GoRouter( routes: [ GoRoute( path: '/', builder: (_, __) => Scaffold( appBar: AppBar(title: const Text('Home Screen')), ), routes: [ GoRoute( path: 'details', builder: (_, __) => Scaffold( appBar: AppBar(title: const Text('Details Screen')), ), ), ], ), ], );
調整 iOS 建置設定
#啟動 Xcode。
開啟 Flutter 專案
ios資料夾內的ios/Runner.xcworkspace檔案。
新增相關聯的網域
#如有必要,請啟動 Xcode。
按一下最上層的 Runner。
在編輯器中,按一下 Runner 目標。
按一下 Signing & Capabilities。
若要新增網域,請在 Signing & Capabilities 下按一下 + Capability。
按一下 Associated Domains。
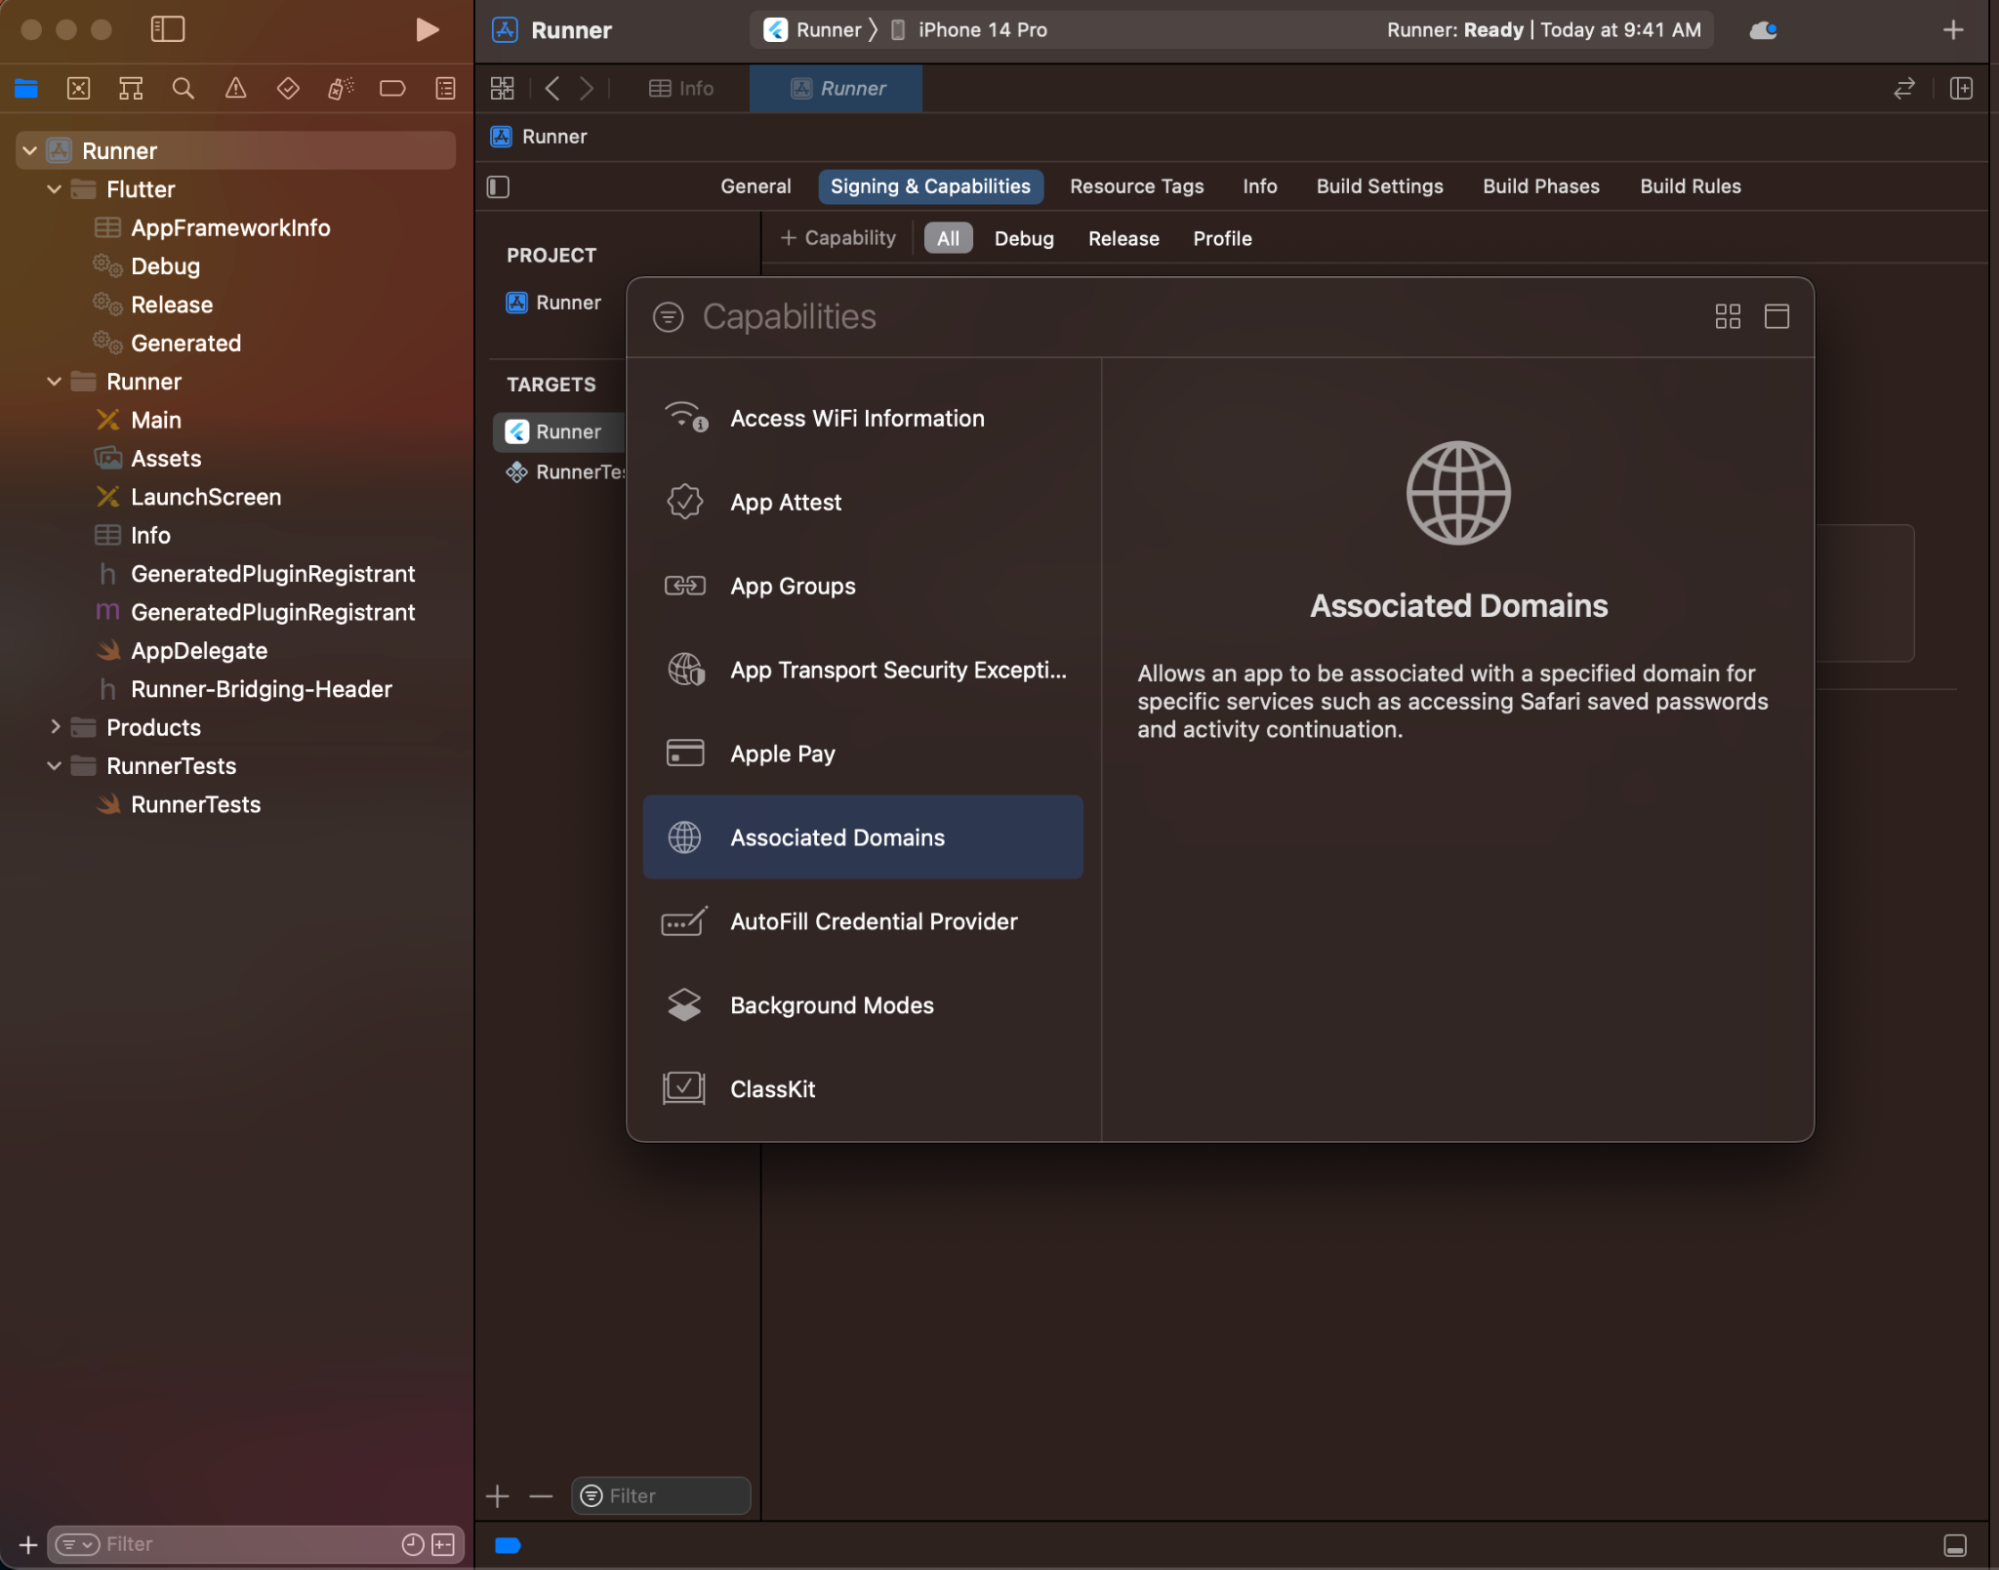
在 Associated Domains 區段中,按一下 +。
輸入
applinks:<web domain>。將<web domain>替換成您自己的網域名稱。
在您偏好的編輯器中開啟
ios/Runner/Runner.entitlementsXML 檔案。在
<dict>標籤內新增一個關聯網域。xml<?xml version="1.0" encoding="UTF-8"?> <!DOCTYPE plist PUBLIC "-//Apple//DTD PLIST 1.0//EN" "http://www.apple.com/DTDs/PropertyList-1.0.dtd"> <plist version="1.0"> <dict> <key>com.apple.developer.associated-domains</key> <array> <string>applinks:example.com</string> </array> </dict> </plist>儲存
ios/Runner/Runner.entitlements檔案。
若要檢查您建立的關聯網域是否可用,請執行下列步驟
如有必要,請啟動 Xcode。
按一下最上層的 Runner。
在編輯器中,按一下 Runner 目標。
按一下 Signing & Capabilities。網域應該會出現在 Associated Domains 區段中。
您已完成深度連結的應用程式設定。
將您的應用程式與您的網域名稱關聯
#您需要在網域中託管一個 apple-app-site-association 檔案。此檔案會告知行動瀏覽器要開啟哪個 iOS 應用程式,而不是瀏覽器。若要建立檔案,請找到您在前一節中建立的 Flutter 應用程式的 appID。
找出 appID 的元件
#Apple 將 appID 的格式設定為 <team id>.<bundle id>。
- 在 Xcode 專案中找出套件 ID。
- 在開發人員帳號中找出團隊 ID。
例如:假設團隊 ID 為 S8QB4VV633,套件 ID 為 com.example.deeplinkCookbook,您將輸入 appID 項目為 S8QB4VV633.com.example.deeplinkCookbook。
建立並託管 apple-app-site-association JSON 檔案
#此檔案使用 JSON 格式。儲存此檔案時,請勿包含 .json 副檔名。根據 Apple 的文件,此檔案應類似下列內容
{
  "applinks": {
    "apps": [],
    "details": [
      {
        "appIDs": [
          "S8QB4VV633.com.example.deeplinkCookbook"
        ],
        "paths": [
          "*"
        ],
        "components": [
          {
            "/": "/*"
          }
        ]
      }
    ]
  },
  "webcredentials": {
    "apps": [
      "S8QB4VV633.com.example.deeplinkCookbook"
    ]
  }
}
將
appIDs陣列中的一個值設為<team id>.<bundle id>。將
paths陣列設定為["*"]。paths陣列指定允許的通用連結。使用星號*會將每個路徑重新導向至 Flutter 應用程式。如有需要,請將paths陣列值變更為更適合您應用程式的設定。將檔案託管在類似下列結構的 URL 中。
<webdomain>/.well-known/apple-app-site-association確認您的瀏覽器可以存取此檔案。
測試通用連結
#使用實體 iOS 裝置或模擬器測試通用連結。
在測試之前,請在 iOS 裝置或模擬器上安裝 Flutter 應用程式,在所需的裝置上使用
flutter run。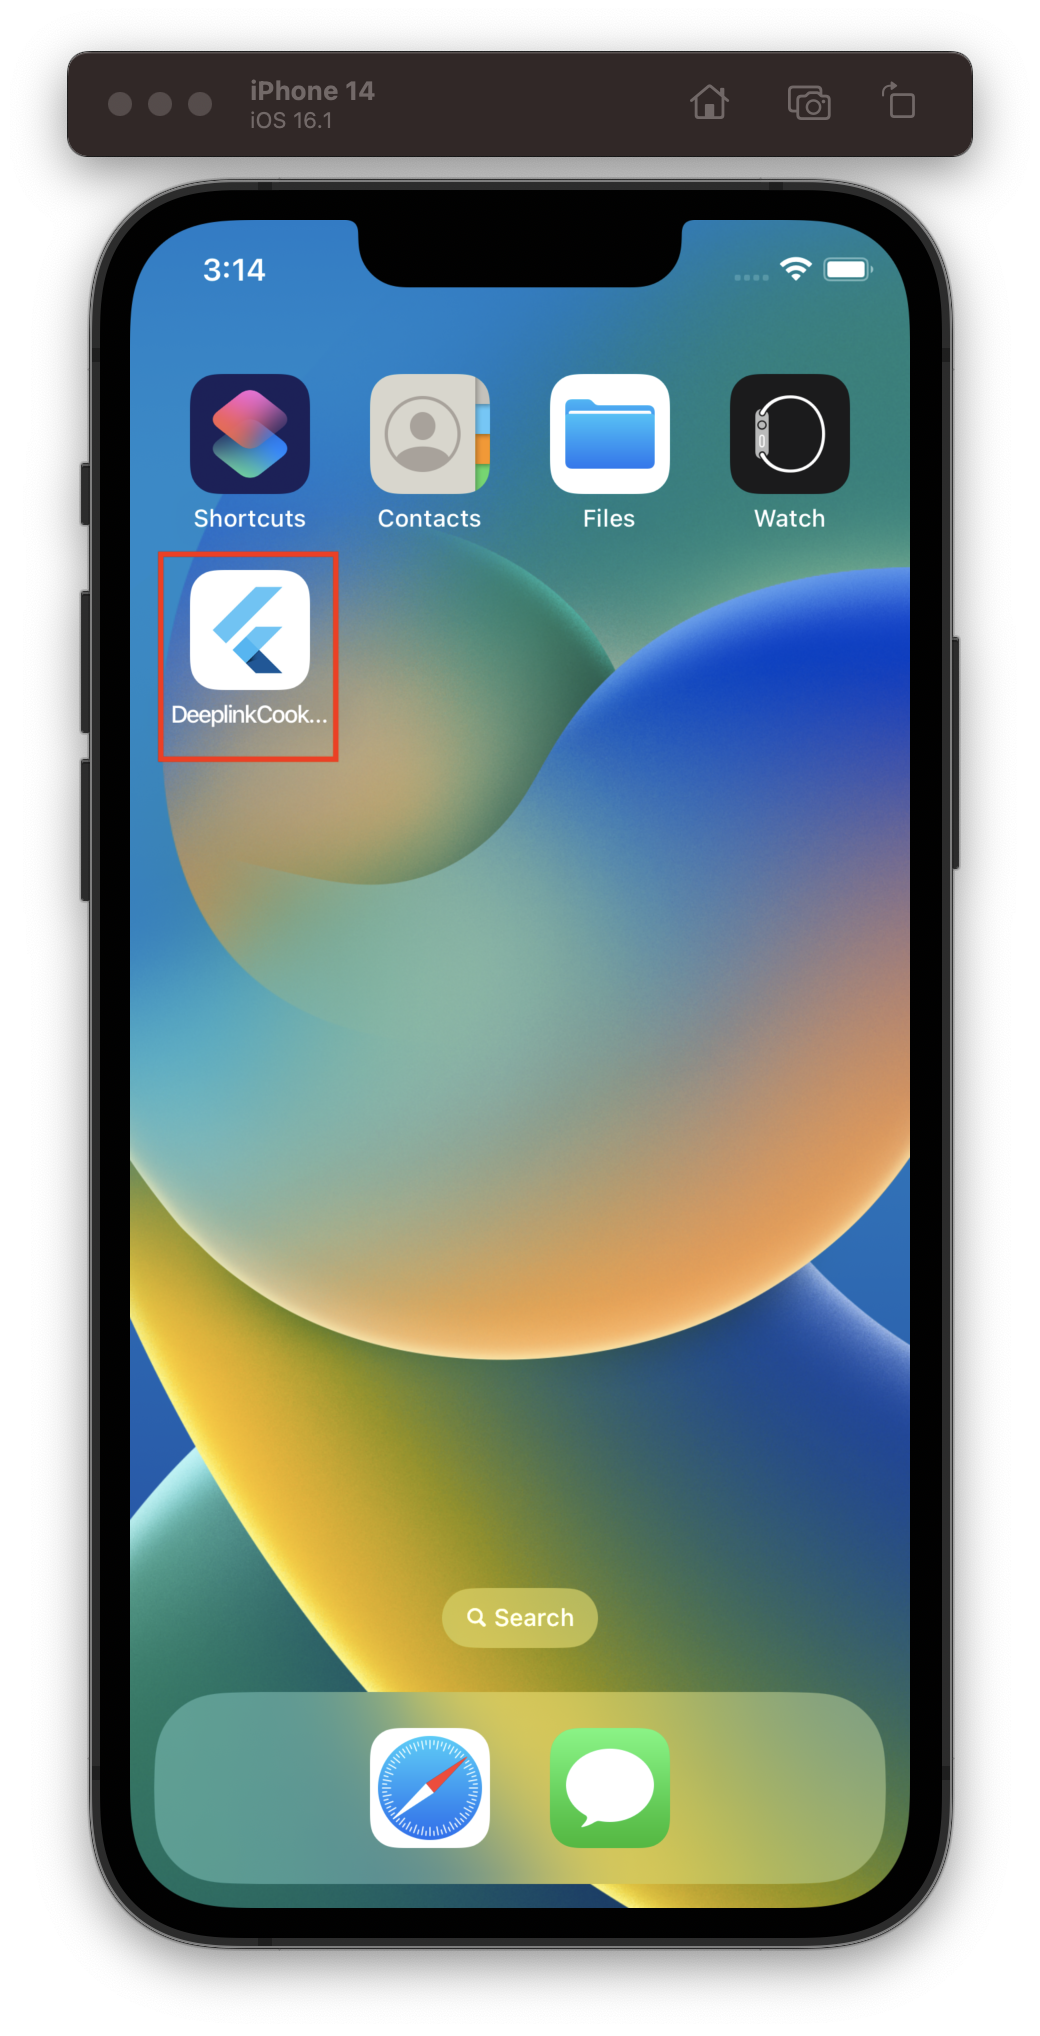
完成後,Flutter 應用程式會顯示在 iOS 裝置或模擬器的首頁畫面上。
如果您使用模擬器進行測試,請使用 Xcode CLI
xcrun simctl openurl booted https://<web domain>/details如果您使用實體 iOS 裝置進行測試
- 啟動 備忘錄 應用程式。
- 在 備忘錄 應用程式中輸入 URL。
- 按一下產生的連結。
如果成功,Flutter 應用程式會啟動並顯示其詳細資料畫面。

尋找原始程式碼
#您可以在 GitHub 存放庫中找到 deeplink_cookbook 食譜的原始碼。
除非另有說明,否則本網站上的文件反映 Flutter 的最新穩定版本。頁面上次更新於 2024-12-04。 檢視原始碼 或 回報問題。